# A Look at React Hooks: useRef to Scroll to an Element
Welcome to another article of [A Look at React Hooks](https://lo-victoria.com/series/a-look-at-react-hooks), a beginner-friendly series on React Hooks. In this article, let's look at a simple application of the `useRef` Hook.
> Before reading this, you should have a basic understanding of the useRef Hook. If not, please read the [Introduction to useRef](https://lo-victoria.com/a-look-at-react-hooks-useref) article first.
In this article, I will show you how to use the useRef Hook to create links in your app to scroll to any section on a web page like this:

Let's get started!
## Step 1: Create React App + Install Package
First, we create a React app. You can use ViteJS or anything you want. For beginners, you can copy this line instead:
```
npx create-react-app my-app-name
```
Then, we install the package we need `react-router-dom`.
```
npm install react-router-dom
```
## Step 2: Create the section components
For this simple tutorial, let's create 3 components that will represent the page sections we will scroll to: `Main`, `About` and `Usage`.
In `App.js`, we import what we need from the 'react-router-dom' package.
```
import { BrowserRouter as Router, Routes, Route, Link } from "react-router-dom";
```
Then, we create our components, which will be the sections in our single page app.
```jsx
//Main component
function Main() {
return (
);
}
```
```jsx
//How to Use component
function Usage() {
return (
How to Use Section
Scroll To Main
About
);
}
```
## Step 3: Assemble components
Now we can add these components into the `App` component and set up React Router components like so:
```jsx
function App() {
return (
);
}
export default App;
```
> If you're not sure how React Router v6 works, please visit their [official documentation](https://reactrouter.com/docs/en/v6/getting-started/overview).
Here's what we should have so far:
## Step 4: Add useRef in App
Now here's where the magic begins!
Import `useRef` at the top of our `App.js` file:
```
import React, { useRef } from "react";
```
Let's initialize the refs for the sections we want our webpage to be able to scroll to. Add these 3 refs in our `App`. Next, we pass them as props in all 3 section components.
```javascript
function App() {
const mainRef = useRef(null); //represents main section
const aboutRef = useRef(null); //represents about section
const usageRef = useRef(null); //represents how to use section
return (
{/*pass refs as props*/}
);
}
```
## Step 5: Assign refs to components
In the `Main`, `About` and `Usage` components, we can access the 3 ref props from the previous step and assign their values to their respective DOM elements.
### How it Works
Our `useRef` Hook initialized the 3 props: **mainRef**, **aboutRef** and **usageRef** as`null` in the `App` component. Now, we are assigning them values to a DOM element by using the `ref` attribute.
So in this case, we take the `mainRef` prop and assign it to a DOM element in `Main` like so:
```html
```
Here's what the `Main` component looks like at this point.
```jsx
function Main({ mainRef, aboutRef, usageRef }) {
return (
Main
About
How To Use
);
}
```
And we do the same thing to the `About` and `Usage` components. Remember to assign to the correct ref props. **aboutRef** to a DOM element in `About` and **usageRef** to a DOM element in `Usage`.
```jsx
function About({ mainRef, aboutRef, usageRef }) {
return (
);
}
```
## Step 6: Create Scroll To function
Now that each section component has a reference to access the DOM element, we can create a `handleScroll` function, where the page will scroll to any ref that is passed as an argument.
```
const handleScroll = (ref) => {
window.scrollTo({
top: ref.offsetTop,
left: 0,
behavior: "smooth",
});
};
```
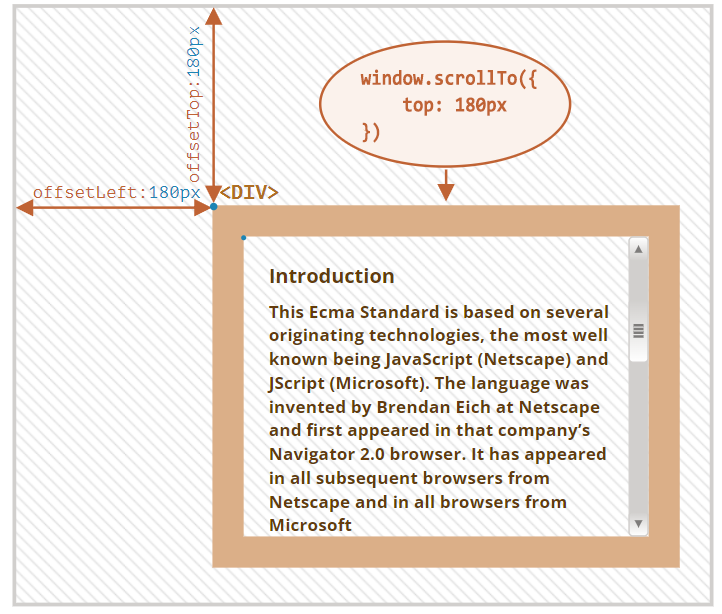
As shown in the function above, we are using the `window.scrollTo` function, where we indicate that we want to scroll to the y-coordinates provided by the `offsetTop` property of the ref DOM element.
Here is an image to visualize the `offsetTop` property.
## Step 7: Add onClick handler to Link
Our last step is to simply add this `handleScroll` function in our Link components so that when the user clicks the link, it will scroll to the corresponding ref element.
Recall that to get the value of the ref, we use `ref.current`. For example, the value of **mainRef** is `mainRef.current`. This will be the ref's value to pass in our `handleScroll(ref)` function.
And so, let's add the onClick handler to the Link inside the section components like so:
```
//About Link
{handleScroll(aboutRef.current);}}>
About
//Usage Link
{handleScroll(usageRef.current);}}>
How To Use
//Main Link
{handleScroll(mainRef.current);}}>
Scroll To Main
```
So here's our final 3 section components with all the onClick handlers in every Link.
```jsx
function Main({ mainRef, aboutRef, usageRef }) {
return (
{
handleScroll(mainRef.current);
}}>Scroll To Main
{
handleScroll(usageRef.current);
}}>How To Use
);
}
```
## Result
Let's take a look at the final result! We can now click the links to scroll to any section in the page where we assigned a ref.
## Conclusion
In this article, we have applied a simple use case of the `useRef` Hook. I hope it has helped you deepen your understanding of the Hook from the [Introduction to useRef](https://lo-victoria.com/a-look-at-react-hooks-useref) article.
Thanks for reading! Please share and like the article if it has been a helpful read. Also, do share in the comments if you'd like me to write more useful applications of other React Hooks. Cheers!
-----------------
## Futher Reading
- [React Hooks series for beginners](https://lo-victoria.com/series/a-look-at-react-hooks)
- [Introduction to useRef](https://lo-victoria.com/a-look-at-react-hooks-useref)