# Introduction to React Context API with Firebase Authentication
Hello everyone! Today's article will be a beginner's introduction to React Context API, as I noticed that this concept is quite complex for React beginners to grasp. And I'll use Firebase Authentication to demonstrate the beauty of using React Context API. Let's begin!
> Note: This article is for Firebase v8 and under only.
**Some prerequisites to follow this tutorial:**
- Basic understanding of React (i.e. props, state, etc.)
- Little understanding of Firebase (but more knowledge will help)
## What's React Context API?
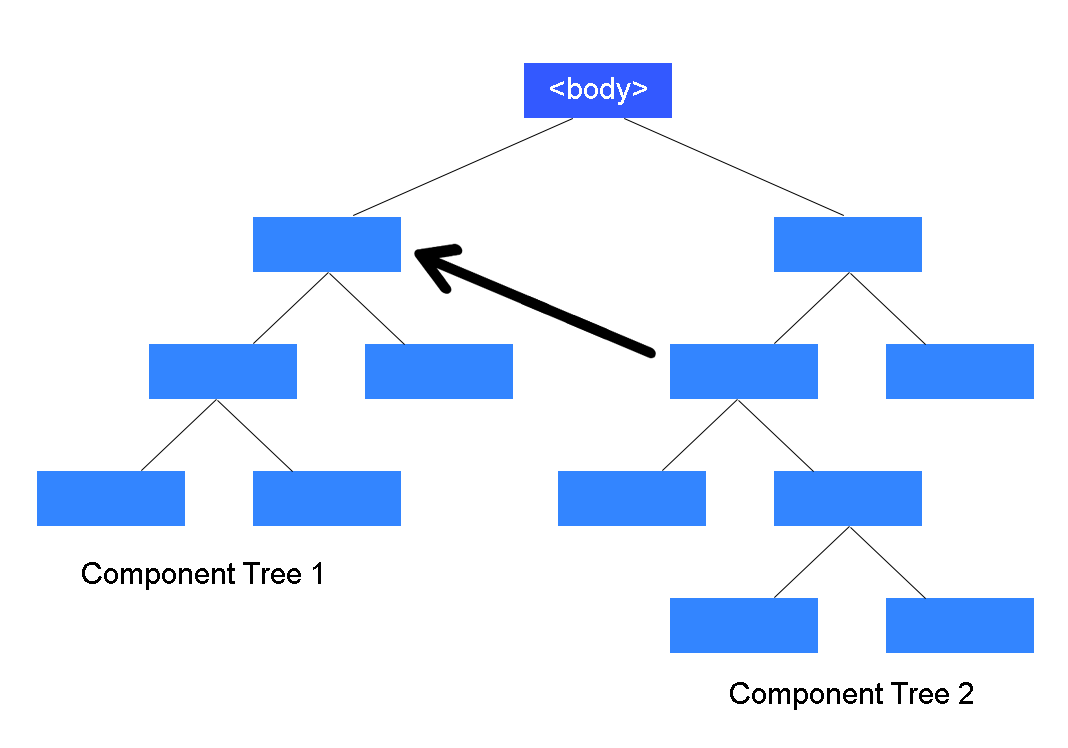
Normally in React we pass something called `props` from the Parent component to its Children components. A React app consists of components, many have Parent-Child relationships and therefore a simple visualization of an app can look like:

Most of the time, we only need to pass from Parent to Child so using the usual `state` and `props` is good enough. But what if we need to pass a `prop` to many components? Even those deeply nested or on another tree?
**Examples of such `props` would be:**
- The user's preferred language
- The theme or color scheme of the app the user has selected
- The authenticated user's properties
In such cases, having to pass the `prop` manually from and to each component would be too tedious! This is called **prop drilling**. So here comes React Context API to the rescue. According to their official documentation,
> React Context API provides the ability to pass props to child components without needing to pass them down manually.
There, so now we know what it is and when we need to use it.
I shall now present a simple example using **Firebase Authentication**. We need to use the Context API, so we don't have to manually pass the authenticated user props to every child component. Let's see how this works.
### Step 1: Create a Firebase project
Head over to https://firebase.google.com/ and create a new project.

On the dashboard, click on the Web icon to initialize Firebase for Web Apps.

Follow the steps by Firebase and you'll reach a page that shows your config variables. This is important so copy and save it somewhere. We will use it soon.

### Step 2: Set up Firebase Authentication
Head over to Authentication as shown in the image below.

Then, you can set the sign-in methods for app. For my example, I'll enable **Google, Email and Facebook.**

### Facebook Sign-in Set Up
For Google and Email authentication, you simply have to press the toggle button to enable it as a sign-in method. For Facebook, you'll need to have a **Facebook Developers account** to set it up.
> This is optional, so please skip to step 3 if you don't plan on using Facebook as an authentication method.
1. Head to https://developers.facebook.com/ and create a developer account
2. Then create a new project and you will see this page. Go to **Settings > Basic**. Copy your App ID and App Secret.

3. Now go back to Firebase and paste them accordingly. At the same time, copy the url as shown in the image below.

4. Back at Facebook for Developers, under 'Add a Product', find a product called **Facebook Login** and click the **'Set Up'** button.

5. Paste the url you copied from Firebase to the field shown in the image below and click **'Save Changes'**.

6. Finally, head to **Facebook Login > Quickstart** and enter the url of your website. In my case, this is only a test app so the url is `http://localhost:3000`. Click **'Save'** and you are done!

Your users can now use Facebook to authenticate themselves into your app.
### Step 3: Set up React Project
With our Firebase Authentication done for our 3 sign-in methods (i.e. Google, Email and Facebook), let's set up our React project to be able to use Firebase.
In the root directory of our project, run:
```
npm install firebase react-firebaseui
```
- `firebase` contains the tools and infrastructure you need to set up firebase in the React app.
- `react-firebaseui` provides pre-made components to handle and display authentication easily.
### Step 4: Firebase config
Create a **'Firebase'** folder in the React App's `src` folder and inside it, create a file named `config.js`. This is where we will paste our config variables from Step 1. If you forgot to copy it, you can always find your config variables from your Firebase **project settings** (see image below).

In `Firebase/config.js`, we will do 3 things:
1. Import dependencies
2. Use `firebase.initializeApp(config)` to create a Firebase app instance
3. Export this app for use in which we will see soon
In code, it should look like:
```
//1. import the dependencies
import * as firebase from "firebase";
import "firebase/auth";
//2. Initialize app with the config vars
const app = firebase.initializeApp({
apiKey: process.env.REACT_APP_API_KEY,
authDomain: process.env.REACT_APP_AUTH_DOMAIN,
databaseURL: process.env.REACT_APP_DATABASE_URL,
projectId: process.env.REACT_APP_PROJECT_ID,
storageBucket: process.env.REACT_APP_STORAGE_BUCKET,
messagingSenderId: process.env.REACT_APP_MESSAGING_SENDER_ID,
});
//3. export it for use
export default app;
```
### Step 5: Firebase context
Now let's use the Context API to create a Firebase context. In the `Firebase` folder, add a new file called `context.js`.
We will do the following:
1. Import React dependencies and the **app** from `config.js`
2. Create and export a React context called `AuthContext` using `React.createContext()`
3. Create and export `AuthProvider` which contains a React Context Provider.
Every Context object has a **Provider** that allows other components to consume its context. In this case, our `AuthProvider` will provide the state of `user` to other components. This is so that any component in our app can determine whether a user has signed in and access the user's properties.
The `user` state is initialized as null with the `useState` hook and is updated using the `useEffect` hook and Firebase's `auth().onAuthStateChanged(setUser)`.
The `onAuthStateChanged` is basically an observer that listens for a change in authentication. That way, whenever a user signs in or out, our `user` state will be automatically updated in our `AuthProvider`.
Here's what the code looks like:
```
//1.
import React, { useEffect, useState } from "react";
import app from "./config";
//2.
export const AuthContext = React.createContext();
//3.
export const AuthProvider = ({ children }) => {
const [user, setUser] = useState(null);
useEffect(() => {
app.auth().onAuthStateChanged(setUser);
}, []);
return (
{children}
);
};
```
### Step 6: Import AuthProvider to App.js
Now, we can import `AuthProvider` to App.js and place all components inside it. This way, it can pass the context to any component in the app (because it is the top node of the component tree).
```
import { AuthProvider } from "./Firebase/context";
function App() {
return (
);
}
```
### Step 7: Sign In Component
We create a `SignIn.js` that displays the sign in buttons for the user to log in to our app. As you can see from the `App.js` code above, my app will render the sign in component at the path `/signin`.
> Note: I'm using React Router v5 for the routing in this tutorial. Do not copy my code if using React Router v6.
There is a "Sign In/ Register" button in the `Nav` component which links to the `/signin` path when clicked, to display the sign in buttons. We will look at our `Nav.js` after this.
So our sign in component will import the following:
```
import React, { useContext } from "react";
import "../App.css";
import firebase from "firebase";
import { FirebaseAuth } from "react-firebaseui";
import { AuthContext } from "../Firebase/context";
import { Redirect } from "react-router-dom";
```
- `useContext` is a React hook which allows the component to consume the context.
- `FirebaseAuth` is the styled component for our sign in methods
- `AuthContext` contains our context which will be consumed by `useContext`
- `Redirect` allows us to redirect the user to the home page once the sign in is successful
Below our import statements, we'll have:
```
export default function SignIn() {
//get the user state from the context
const { user } = useContext(AuthContext);
//this is our config for FirebaseAuth
const uiConfig = {
signInFlow: "popup",
signInOptions: [
firebase.auth.GoogleAuthProvider.PROVIDER_ID,
firebase.auth.FacebookAuthProvider.PROVIDER_ID,
firebase.auth.EmailAuthProvider.PROVIDER_ID,
],
callbacks: {
signInSuccess: () => false,
},
};
//if user exists or signed in, we redirect the page to home, else display the sign in methods with FirebaseAuth
return (
{!!user ? (
) : (
Please Sign In
)}
);
}
```
### Final Step: Conditional Rendering at Nav.js
Finally, we make our `Nav` component to show a sign in button if there's no user currently authenticated. If a user does exists, we shall display their name and picture by accessing the user's `displayName` and `photoURL` properties. More user properties can be found in the docs [here](https://firebase.google.com/docs/reference/js/firebase.User).
Also, we will have a 'Sign out' Link that executes `app.auth().signOut()` when clicked to sign the user out.
Here's our `Nav.js`:
```
import { AuthContext } from "../Firebase/context.js";
export default function Nav() {
//get the user state from context
const { user } = useContext(AuthContext);
//if user exists, display user name and picture.
//else, show a sign in button instead
return (
{!!user ? (
{`Welcome, ${user.displayName}`}
Create Stories
My Stories
app.auth().signOut()}>Sign Out
) : (
)}
);
}
```
## Our Final Result

**Yay! That's so cool, isn't it? **
In conclusion, the React Context API provides a beautiful and simple way to create context to pass data to other components in your app. I hope this article has been helpful to learning how to use the Context API as well as Firebase Authentication. Thanks so much for reading. Please leave any questions or comments below. Optionally, read the resources below to learn more about what we discuss today. Till next time, cheers!
-------
## Further Reading
- [React Context API Documentation](https://reactjs.org/docs/context.html)
- [Firebase for Web Apps Documentation](https://firebase.google.com/docs/auth/web/start)